
How to Build a Vacation Request App with Power Apps, Power Automate and SharePoint (with Manager Approval and Leave Balances)
Vacation requests by email work fine until they don't. Someone's request sits unread in a manager's inbox, HR finds out about the time off after it's taken, and nobody is quite sure how many days anyone has left.
In this guide we'll build a simple leave request system on Microsoft 365: a canvas app in Power Apps for employees, a Power Automate approval flow that goes to each employee's manager, and SharePoint lists as the back end. Managers can approve, reject, or ask for different dates with a reason, and the employee gets an email either way. Days come off the right balance (vacation, sick or personal) as soon as a request is submitted, and go back if it isn't approved.
It's also properly secured. Employees see only their own requests, managers see their team's, and admins see everything. That's enforced by SharePoint item-level permissions, not just filters in the app.

What you'll build
A canvas app where employees pick a leave type and dates, see how many working days the request uses, and submit it.
Balance tiles per leave type (Vacation, Sick, Personal). The app blocks requests that are bigger than the balance.
An approval flow that routes each request to the employee's manager from Microsoft Entra ID (Azure AD), with a fallback approver when no manager is set.
Three outcomes: Approved, Rejected, or Change dates, each with the manager's comments.
A result email to the employee with a coloured status badge and their remaining balance.
Automatic deduct and refund: days come off when the request is submitted and are added back if it's rejected or sent back for new dates.
Item-level security so each request is visible only to the employee, their manager and the admins.
What you'll need
Microsoft 365 with SharePoint Online, Outlook and Power Apps / Power Automate (the standard connectors used here are included with most business plans; no premium licence is needed).
Permission to create a SharePoint site, or an existing site you own.
Managers filled in on user profiles in Microsoft Entra ID, so the flow can find each employee's approver.
Step 1: Create the SharePoint site and lists
Create a new team or communication site, for example HR Requests. Then add three lists.
Vacation Requests
This is where every request lives. Rename the Title column to Request, then add these columns:
Employee: Person
EmployeeEmail: Single line of text
Manager: Person
ManagerEmail: Single line of text
LeaveType: Choice (Vacation, Sick, Personal), default Vacation
StartDate and EndDate: Date only
Days: Number
EmployeeNotes: Multiple lines of text
Status: Choice (Pending, Approved, Rejected, Change dates), default Pending
ManagerComments: Multiple lines of text
We store the emails as plain text as well as the Person columns because text columns are easy to filter on in Power Apps without delegation warnings.

Leave Balances
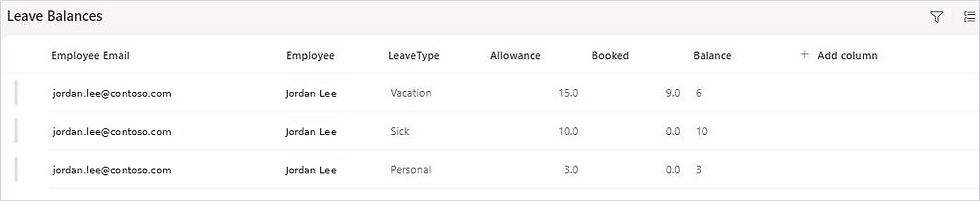
One row per employee per leave type:
Title (rename to Employee Email): the employee's email, in lower case
Employee: Person
LeaveType: Choice (Vacation, Sick, Personal)
Allowance: Number (the yearly entitlement)
Booked: Number, default 0
Balance: Calculated, with the formula below and the output type set to Single line of text
=(Allowance-Booked)&""Why text? A calculated number column is returned to Power Apps and Power Automate as "6.00000000000000". Returning it as text keeps it clean.
App Admins
A simple list with just the Title column. Add one row per admin with their email address in lower case. The app uses it to switch on the All requests view, and the flow uses the first admin as the fallback approver.
Step 2: Set the list permissions
Filters in an app are not security. Anyone with access to the list could open it in SharePoint and see everything, so we lock the lists down first and let the flow grant access per request.
Site: give your staff (for example "Everyone except external users" in the site Members group) Read on the site.
Vacation Requests: stop inheriting permissions and give Members Contribute, so employees can create requests from the app. Owners keep Full Control.
Leave Balances: stop inheriting permissions and give Members Read. Then break inheritance on each balance row so only the owners and that employee can read it. Only the flow (running as an owner) changes the Booked column.
App Admins: Members Read, so the app can check whether the current user is an admin.
In the next steps the flow removes the Members group from each new request and gives Read to just the employee and their manager. The admins are in the Owners group, so they still see everything.
Step 3: Create the flow
In Power Automate, choose Create > Automated cloud flow. Name it Vacation Request Approval and pick the SharePoint trigger When an item is created.

Set Site Address to your HR Requests site and List Name to Vacation Requests.

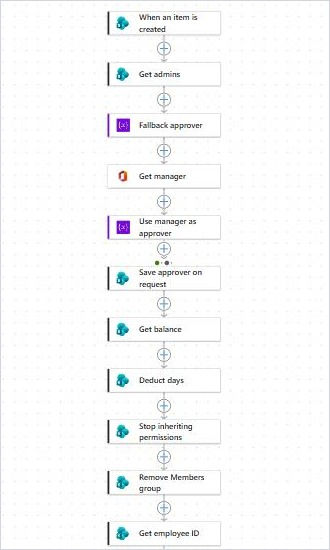
Here's the whole flow we're about to build, from top to bottom.


Step 4: Find the approver
First, get a fallback approver in case the employee has no manager in Entra ID.
Get admins: SharePoint Get items on the App Admins list, with Top Count set to 1.
Fallback approver: Initialize variable, name ApproverEmail, type String, with this value:
first(outputs('Get_admins')?['body/value'])?['Title']Get manager: Office 365 Users Get manager (V2), with User set to the EmployeeEmail value from the trigger.
Use manager as approver: Set variable ApproverEmail to the manager's Mail output.
If the employee has no manager, Get manager fails and Use manager as approver is skipped. So on the next action open Settings > Run after and tick both "is successful" and "is skipped". The flow then carries on with the fallback approver.
Save approver on request: SharePoint Update item on Vacation Requests, with Id from the trigger. Set Manager Claims to the ApproverEmail variable and ManagerEmail to:
toLower(variables('ApproverEmail'))This is what powers the My team view in the app.
Step 5: Deduct the days from the balance
Get balance: SharePoint Get items on Leave Balances, Top Count 1, with this Filter Query:
Title eq '@{toLower(triggerOutputs()?['body/EmployeeEmail'])}' and LeaveType eq '@{triggerOutputs()?['body/LeaveType/Value']}'Deduct days: SharePoint Update item on Leave Balances. Use the ID of the first result, and set Booked to:
add(float(coalesce(first(body('Get_balance')?['value'])?['Booked'],0)), float(triggerOutputs()?['body/Days']))Deducting at submit time means two requests submitted close together can't both spend the same days.
Step 6: Lock the request down with item-level permissions
We use four SharePoint Send an HTTP request to SharePoint actions. All of them point at your HR Requests site, use the POST method, and have the header Accept: application/json;odata=nometadata.
Stop inheriting permissions. Uri:
_api/web/lists/getbytitle('Vacation Requests')/items(@{triggerOutputs()?['body/ID']})/breakroleinheritance(copyRoleAssignments=true,clearSubscopes=true)Remove Members group. This removes the Members group's Contribute access from this one item. Look up your Members group ID under Site settings > People and groups (it's in the URL as MembershipGroupId), and replace 5 if yours is different. 1073741827 is the ID of the built-in Contribute role.
_api/web/lists/getbytitle('Vacation Requests')/items(@{triggerOutputs()?['body/ID']})/roleassignments/removeroleassignment(principalid=5,roledefid=1073741827)Get employee ID and Get manager ID. SharePoint needs a user ID, not an email. The ensureuser endpoint returns it and adds the user to the site if needed. Uri:
_api/web/ensureuserBody for the employee (use variables('ApproverEmail') for the manager):
{ "logonName": "@{triggerOutputs()?['body/EmployeeEmail']}" }Employee can read and Manager can read. 1073741826 is the built-in Read role. For the manager, use body('Get_manager_ID') instead.
_api/web/lists/getbytitle('Vacation Requests')/items(@{triggerOutputs()?['body/ID']})/roleassignments/addroleassignment(principalid=@{body('Get_employee_ID')?['Id']},roledefid=1073741826)After this runs, the request is visible only to the employee, their manager and the site owners (your admins). The employee has Read only, so they can't edit a request once it's submitted.
Step 7: Send the approval
Add Approvals Start and wait for an approval, with Approval type Custom Responses - Wait for one response. Add three response options: Approve, Reject and Change dates.
Title:
@{triggerOutputs()?['body/LeaveType/Value']} request: @{triggerOutputs()?['body/Employee/DisplayName']}, @{formatDateTime(triggerOutputs()?['body/StartDate'],'MMM d')} to @{formatDateTime(triggerOutputs()?['body/EndDate'],'MMM d, yyyy')}Assigned to: the ApproverEmail variable. Put the leave type, dates, working days, notes and the balance left if approved in Details. The Details box supports Markdown, so bold labels work. For the balance line use:
sub(float(first(body('Get_balance')?['value'])?['Balance']), float(triggerOutputs()?['body/Days']))Add a line telling the manager to pick Change dates if the timing doesn't work and to suggest new dates in the comments. Set Item link to the trigger's Link to item so they can open the request in SharePoint.
The manager gets the approval in Outlook, in Teams and in the Power Automate Approvals centre.

Step 8: Record the decision and refund the days
Decision status: a Compose action that turns the manager's answer into our status values:
if(equals(outputs('Start_and_wait_for_an_approval')?['body/outcome'],'Approve'),'Approved',if(equals(outputs('Start_and_wait_for_an_approval')?['body/outcome'],'Reject'),'Rejected','Change dates'))Save decision: Update item on Vacation Requests. Set Status to the output of Decision status and ManagerComments to:
first(outputs('Start_and_wait_for_an_approval')?['body/responses'])?['comments']Refund if not approved: a Condition where the Decision status output is not equal to Approved. In the True branch, get the balance row again (the same Get items as Step 5, named Get balance again) and update it with:
max(0, sub(float(coalesce(first(body('Get_balance_again')?['value'])?['Booked'],0)), float(triggerOutputs()?['body/Days'])))We read the row again rather than reusing Step 5 because the approval can take days, and other requests may have changed the balance in the meantime.
Step 9: Email the employee
Read balance: one more Get items on Leave Balances with the same filter, so the email shows the balance after any refund.
Email the employee: Office 365 Outlook Send an email (V2) to the EmployeeEmail value. Subject:
Your @{toLower(triggerOutputs()?['body/LeaveType/Value'])} request: @{outputs('Decision_status')}In the body, switch to the code view (</>) and build a small HTML table: a greeting, a one-line message that depends on the status, a coloured status badge, the dates, working days, manager comments and "days left". The badge colour is one expression:
if(equals(outputs('Decision_status'),'Approved'),'#107c10',if(equals(outputs('Decision_status'),'Rejected'),'#a4262c','#8a5a00'))


Save the flow and turn it on.
Step 10: Build the canvas app
In Power Apps, create a blank Tablet canvas app and add the three lists as data sources: Vacation Requests, Leave Balances and App Admins.
Who is the user?
Select App and add these named formulas in the Formulas property:
MyEmail = Lower(User().Email);
IsAdmin = !IsBlank(LookUp('App Admins', Title = MyEmail));
IsManager = !IsBlank(LookUp('Vacation Requests', ManagerEmail = MyEmail));
Because the lists themselves are secured, a user who isn't a manager simply gets no rows back from the team filter. The buttons are a convenience, not the security.
Home screen
Three toggle buttons: My requests (always), My team (Visible: IsManager || IsAdmin) and All requests (Visible: IsAdmin). Each one sets a varView variable, for example Set(varView, "Team").
A horizontal gallery for the balance tiles. Items: Filter('Leave Balances', Title = MyEmail). Inside, show ThisItem.LeaveType.Value and Round(Value(ThisItem.Balance), 1) & " days left".
A vertical gallery for the requests, with a coloured status label and the manager's comments. Its Items property:
SortByColumns(If(varView = "All", 'Vacation Requests', varView = "Team", Filter('Vacation Requests', ManagerEmail = MyEmail), Filter('Vacation Requests', EmployeeEmail = MyEmail)), "Created", SortOrder.Descending)A status colour on the label's Fill:
Switch(ThisItem.Status.Value, "Approved", RGBA(16,124,16,1), "Rejected", RGBA(164,38,44,1), "Change dates", RGBA(160,100,0,1), RGBA(96,110,125,1))Screen OnVisible: Refresh('Vacation Requests'); Refresh('Leave Balances') so statuses and balances are always current.
Here's the admin's All requests view, with each employee's name on the row.

New request screen
A leave type drop-down with Items ["Vacation", "Sick", "Personal"].
A hidden label with the available balance for the selected type:
Coalesce(Value(LookUp('Leave Balances', Title = MyEmail && LeaveType.Value = ddType.Selected.Value).Balance), 0)Two date pickers for the first and last day off.
A hidden label that counts working days (Monday to Friday) between the two dates:
With({s: dpStart.SelectedDate, e: dpEnd.SelectedDate}, If(e < s, 0, CountIf(Sequence(DateDiff(s, e, TimeUnit.Days) + 1, 0), Weekday(DateAdd(s, Value, TimeUnit.Days), StartOfWeek.Monday) < 6)))A message that shows the days used and what's left, or a red warning when the request is bigger than the balance.
A Submit button that is disabled when the dates are wrong or the balance is too low.


The Submit button's OnSelect creates the item with Patch. The flow picks it up from there:
Patch('Vacation Requests', Defaults('Vacation Requests'), { Title: ddType.Selected.Value & " " & Text(dpStart.SelectedDate, "yyyy-mm-dd"), LeaveType: {Value: ddType.Selected.Value}, Employee: { '@odata.type': "#Microsoft.Azure.Connectors.SharePoint.SPListExpandedUser", Claims: "i:0#.f|membership|" & MyEmail, DisplayName: User().FullName, Email: MyEmail, Department: "", JobTitle: "", Picture: "" }, EmployeeEmail: MyEmail, StartDate: dpStart.SelectedDate, EndDate: dpEnd.SelectedDate, Days: Value(lblDaysCalc.Text), EmployeeNotes: txtNotes.Text, Status: {Value: "Pending"} });
Notify("Request sent. Your manager will get an approval request.", NotificationType.Success); Navigate(Screen1, ScreenTransition.UnCover)
Save and publish the app, then share it with your staff (for example the same Members group).
Step 11: Test all three outcomes
Submit a few requests from the app and answer each approval differently:
Change dates, with a comment suggesting new dates. The status goes to Change dates, the days go back to the balance, and the employee gets the amber email.
Approve. The days stay booked and the email shows the new balance.
Reject a sick day request. The days are refunded, so Sick goes back to 10.
Then sign in as a different employee. They should see only their own requests in the app, and SharePoint should show them nothing else in the list either.
Who sees what
Employee: their own requests (Read only once submitted) and their own balances.
Manager: their own requests plus every request routed to them, through the My team view.
Admin: everything, through the All requests view and the site Owners group.
The flow: runs with the flow owner's connection, which is why the owner account needs Full Control on the site.
Make it production-ready
Public holidays: keep a Holidays list and exclude those dates in the working-days formula and in the flow.
Half days: change Days to allow decimals and add a half-day toggle in the app.
Yearly reset: a scheduled flow on January 1 (or your anniversary date) that sets Booked back to 0 and applies carry-over rules.
Cancellations: add a Cancel button for Pending or Approved requests that refunds the days.
Onboarding: a flow that creates the three balance rows (with item permissions) when someone new joins.
Service account: run the flow with a dedicated account rather than a person's, so it doesn't break when someone leaves.
The fun part: out-of-office bingo
Mark every one you've seen:
"I'll be off Friday" in a Teams chat, sent Friday morning.
A vacation approved by reply-all.
Two people on the same team off the same week, both "approved".
An out-of-office reply that says "back on Monday" from three Mondays ago.
Someone asking HR how many days they have left. In December.
Three or more? This app will pay for itself before the holidays.
Need a hand?
Smart Solutions builds Power Apps and Power Automate solutions for Canadian businesses, from leave and expense approvals to full HR and operations apps. Contact us and we'll help you roll this out, or build something tailored to your policies.
Running purchase requests, vendors and approvals by email too? Take a look at ProcuraCloud, our Canadian-built procurement and business management platform for small and mid-sized businesses.


Comments